

Connect Gmail to JANDI
How many e-mails do you receive every day? Maybe you have to check more than dozens or even hundreds of e-mails a day. If you can divide e-mail notifications into categories and even can connect to JANDI topic, wouldn’t it be more convenient?
Anyone can easily connect customized Gmail notifications to JANDI by using JANDI Connect webhook feature.
Now, let’s learn how to connect Gmail to JANDI. In this posting, we’re going to receive labeled Gmail notifications to ‘Gmail notifications’ JANDI topic.
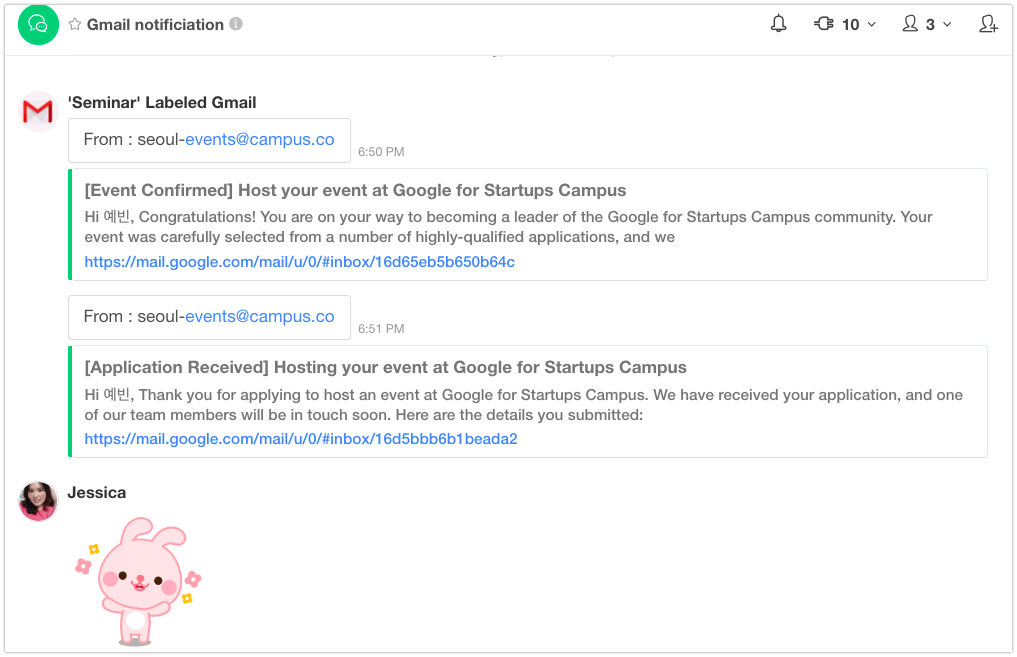
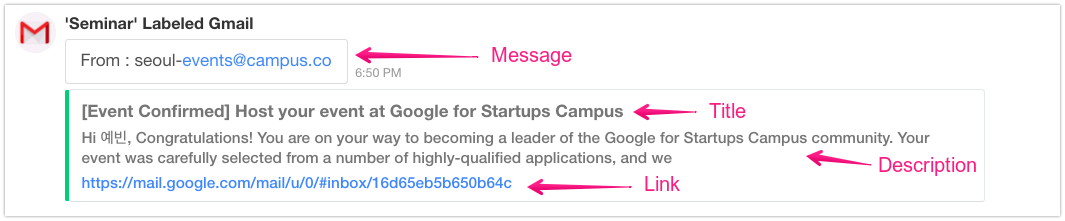
< Gmail notification messages coming into the JANDI topic>
1. Make JANDI Connect incoming webhook.
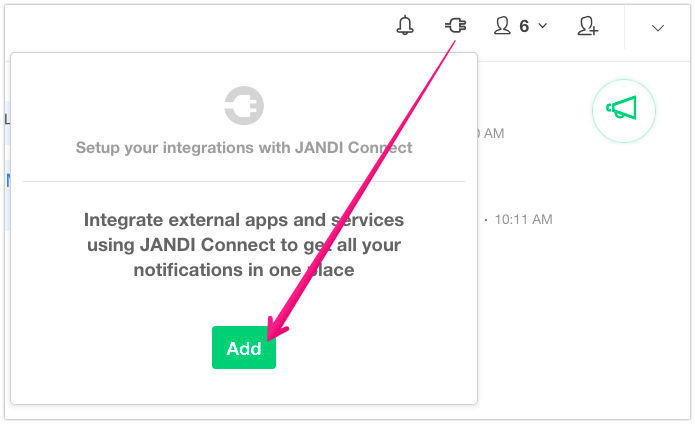
1-1. Click on the plug-shaped [JANDI Connect] button on the upper right-hand side of the topic (that you’re going to receive Gmail notifications), then click on [Add].
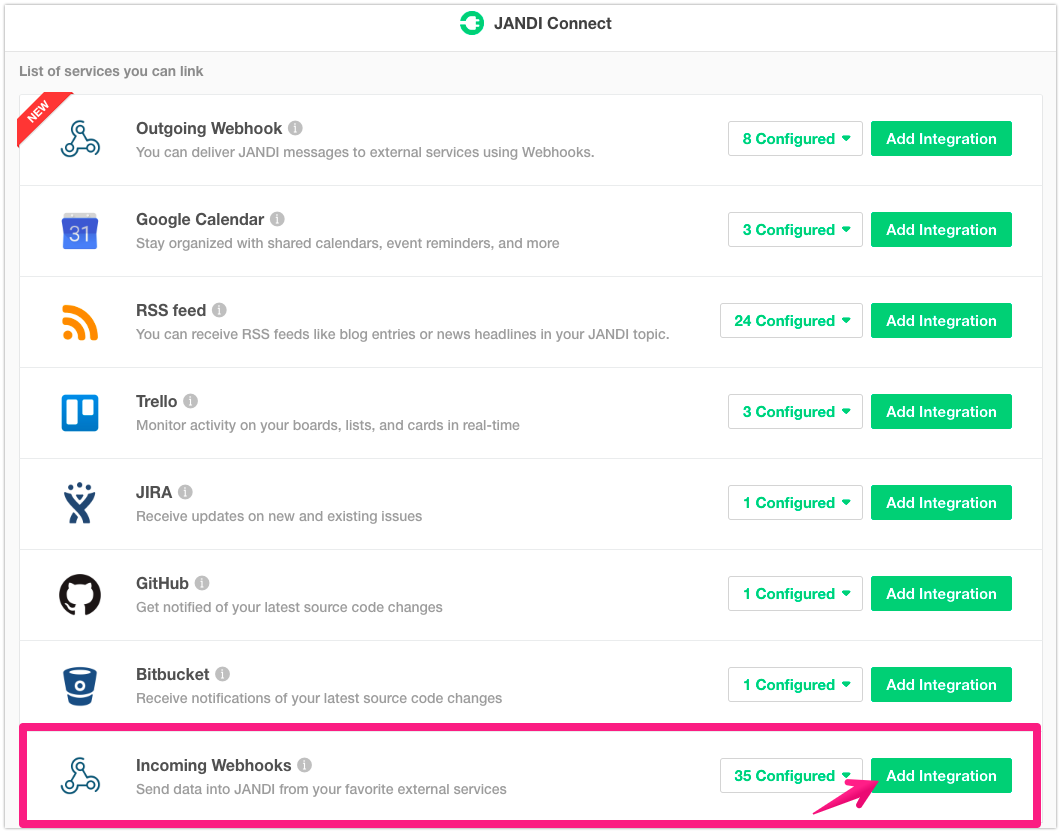
1-2. Click on the [Add Integration] button in the ‘Incoming Webhook’ at the bottom of the JANDI Connect services list.
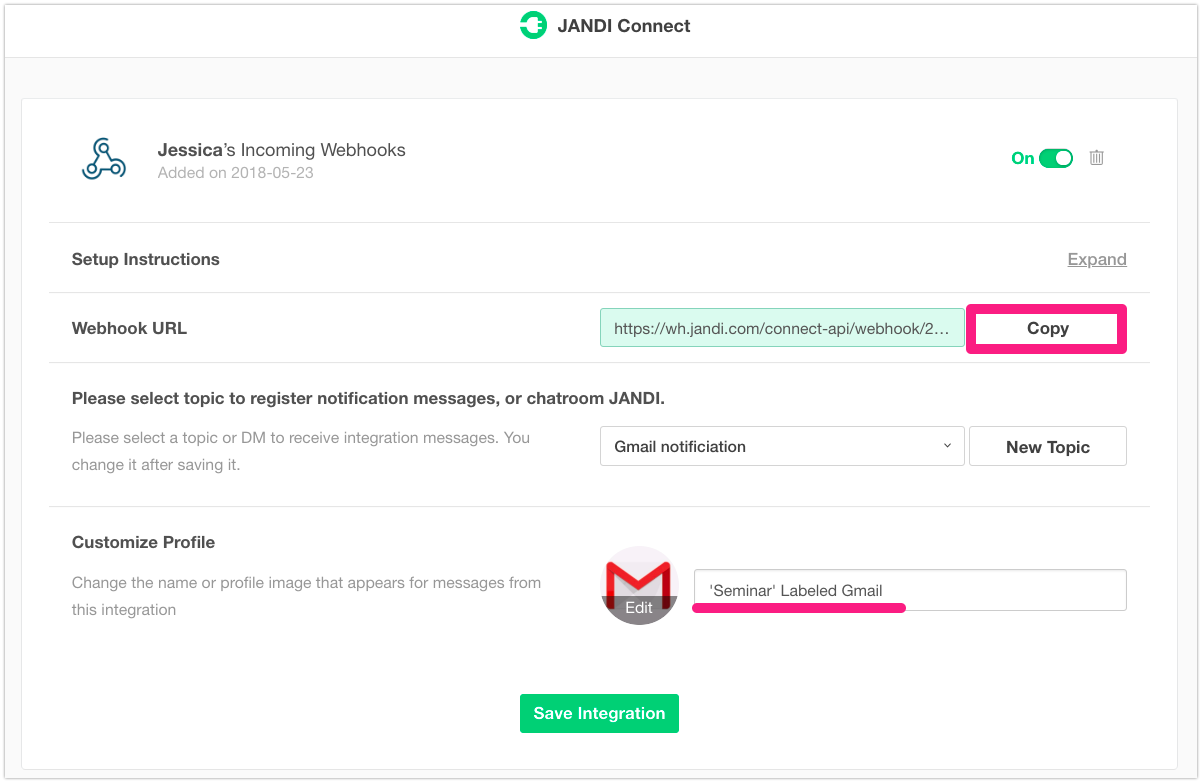
1-3. Please set the connect details.
- Click on the [Copy] button to save the webhook URL to the clipboard.
- Please check if the topic to be linked is set properly.
- Please set the profile picture and name of the webhook.
- Click [Save Integration] button and JANDI connect webhook is ready for receiving data from Gmail.
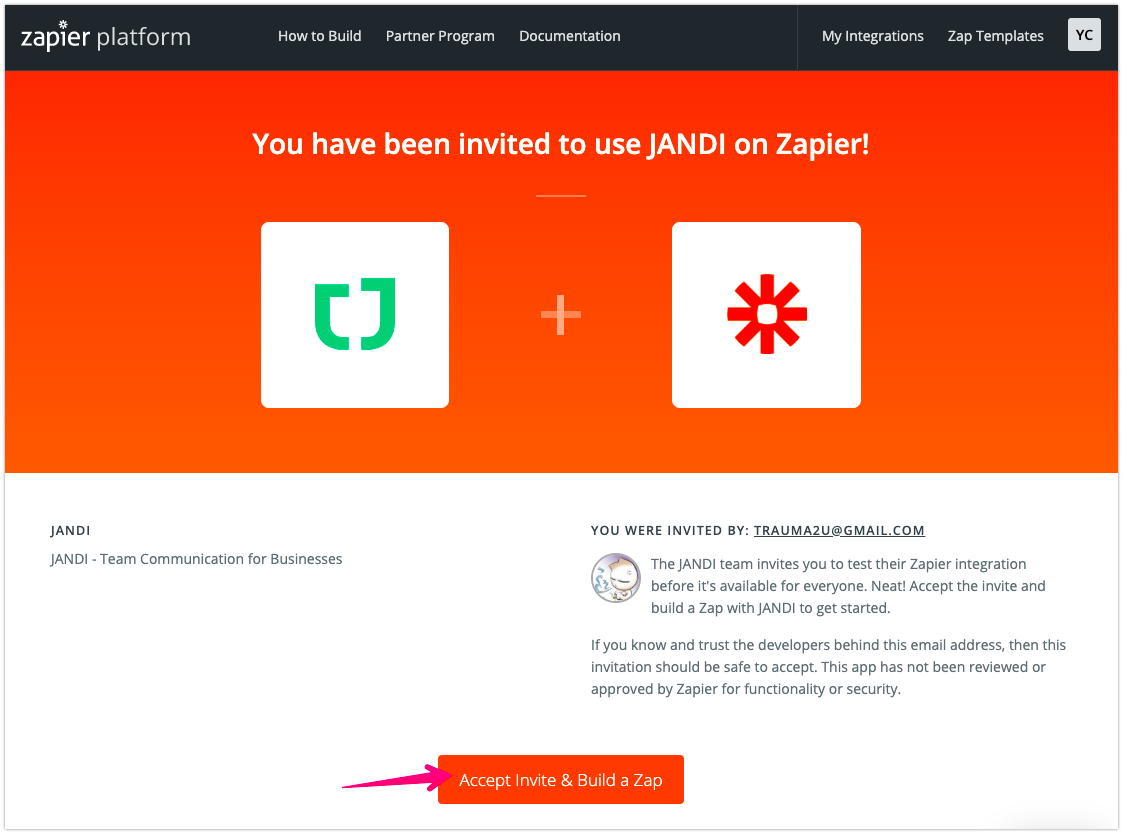
2. Register JANDI Beta Tester on Zapier
- Move to Zapier and be a JANDI beta tester.
- Zapier is an online automation tool that connects apps and services. You can connect two or more apps to automate repetitive tasks without coding or relying on developers to build the integration. (*Learn Key concepts in Zapier)
- To be a JANDI beta tester on Zapier, click [Accept Invite & Build Zap] and login.
Register JANDI Beta Tester on Zapier : bit.ly/zapier-jandi
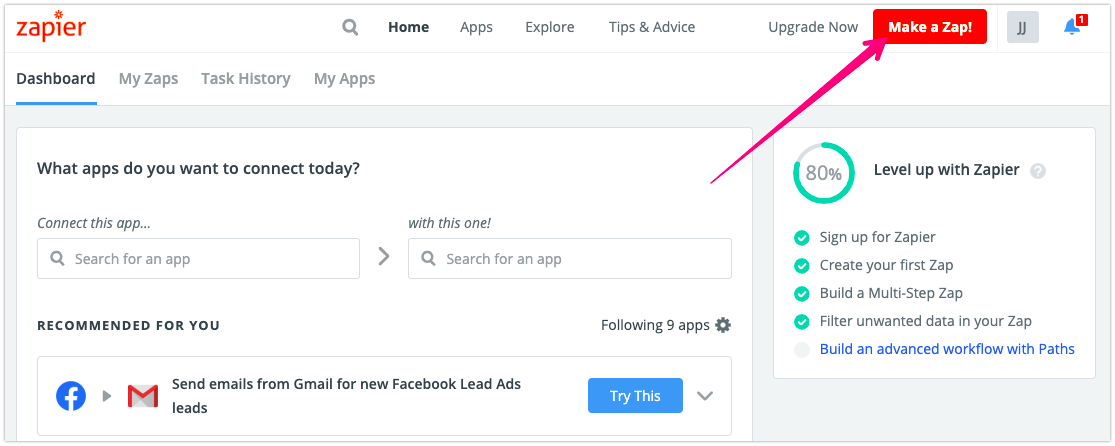
3. Make Zap in Zapier
3-1. Once you are logged in Zapier, click on the [Make a Zap!] button at the upper right-hand corner of the main screen.
- A zap is a unit of connecting apps for Zapier services.
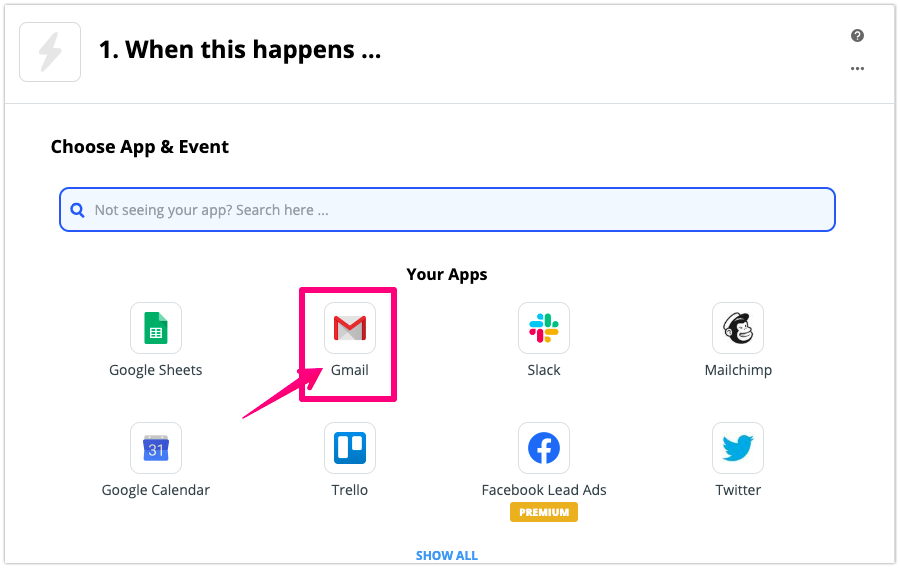
3-2. Select the ‘Gmail’ app on the ‘1. When this happens…’ step.
3-3. Let’s choose ‘New Labeled Email’ as a trigger event.
- When a new labeled Gmail arrives, JANDI notification messages will be sent.
- For example, an email with a new ‘Seminar’ label, not all Gmail, will only be picked up to send JANDI notification message.
- When finished, click the [CONTINUE] button to move on to the next step.
![]()

* Trigger is an event when the Zapier will send notifications to other services.
* We have set the ‘New Labeled Email’ notification as to the trigger in Zapier. If a trigger event is selected as ‘New Email’, all mail can be notified and your own customized notification filters can be selected differently.

3-4. Login Google account that you want to connect Gmail and continue.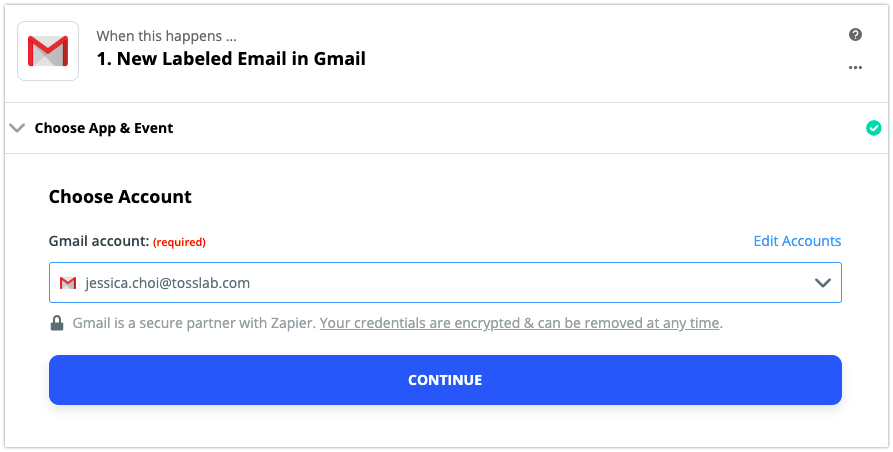
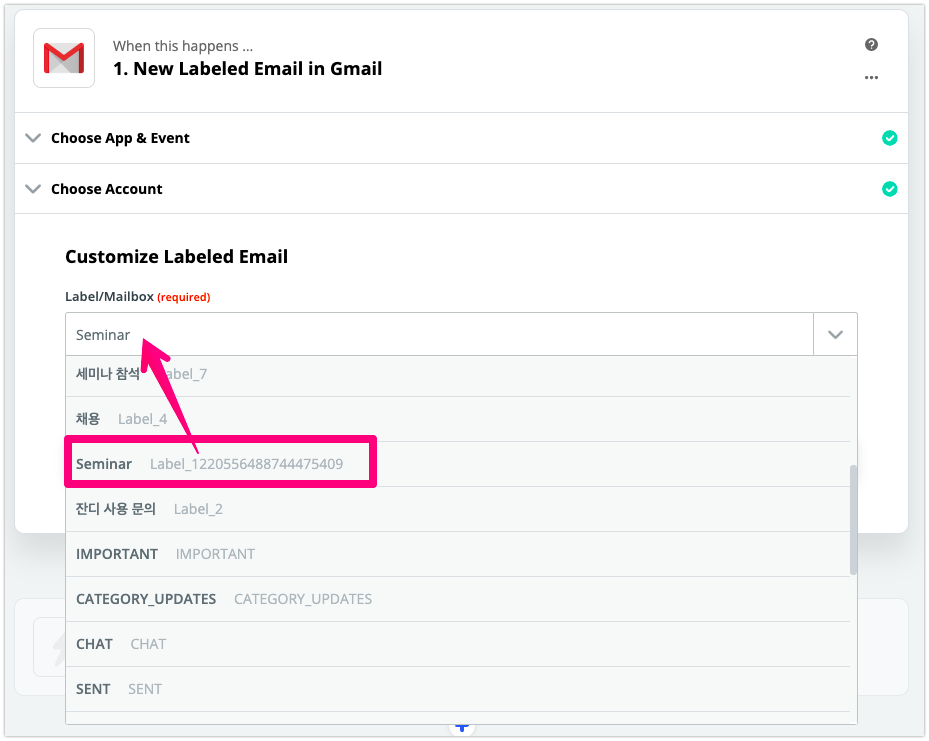
3-5. Select the label or mailbox you want to be notified of. I created a ‘Seminar’ label to separate offline event-related emails only. When finished, click the [CONTINUE] button to move on to the next step.
3-6. Now, make sure! Press the [Test & Continue] button to verify that the data is successfully connected. If the test is not working, it causes errors.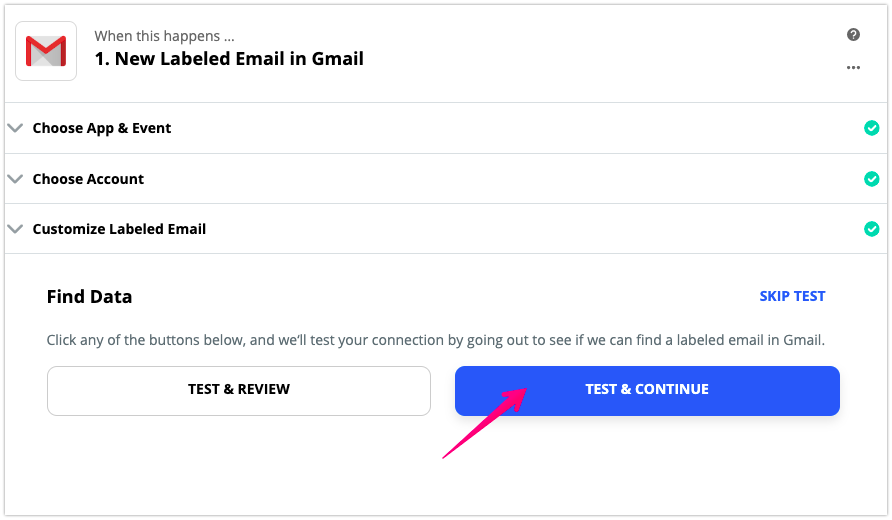
If the test confirms that the sample data are connected properly, click the [Done Editing] button to proceed to the next step.
3-7. I’m going to convert the data from the Gmail into JANDI message. Search ‘JANDI’ and choose the app on ‘2. Do this…’ step.
- if JANDI app is not searchable, please register JANDI beta tester again.
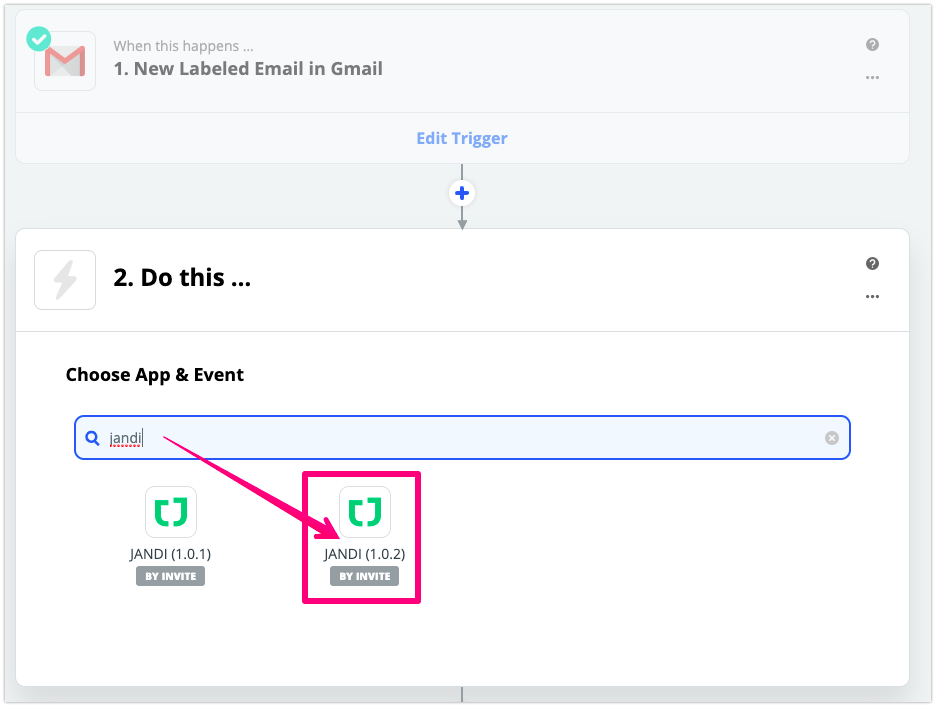
Action event is automatically selected as ‘Send Incoming Webbook’. When finished, click the [CONTINUE] button to move on to the next step.

3-8. login JANDI account.

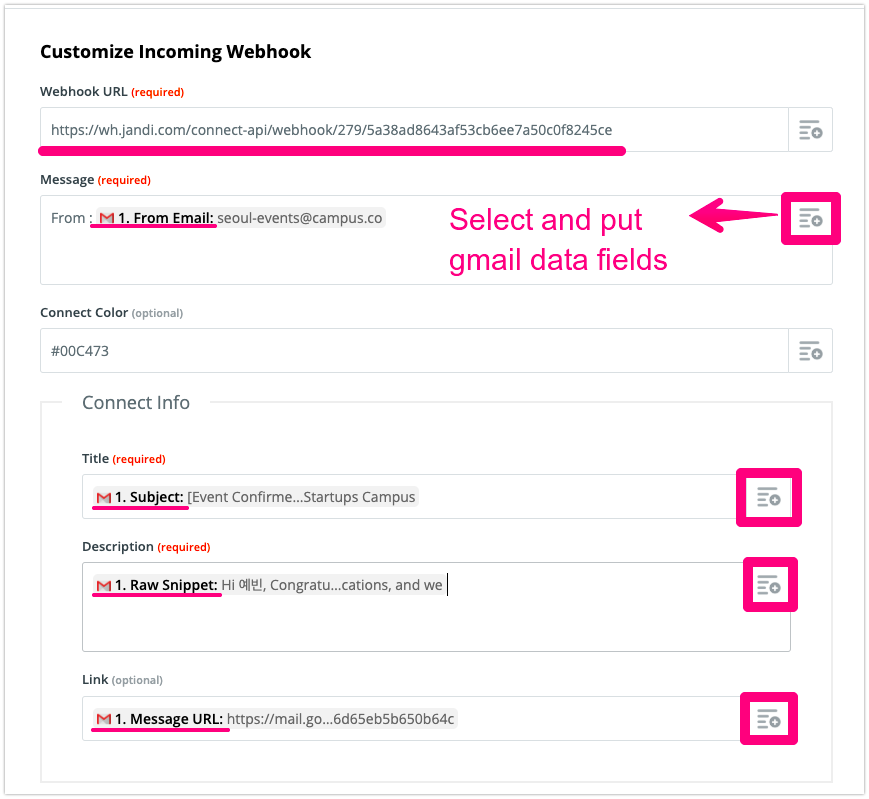
3-9. Set the webhook information you will receive on JANDI.
- In the URL section, paste the copied JANDI webhook URL in the JANDI connect step above.
- What you will be typing in the slot of the data item is the notification template that you will receive in the form of a message from JANDI.
- Fill in the slot of the Message, Title, and Description.
- click [=+] button and select the data you want to get from Gmail.
- ex) From, Subject, Body Plain, Message Url, etc.
- click [=+] button and select the data you want to get from Gmail.
![]() ⬇︎
⬇︎
<Example of JANDI Message Templates>
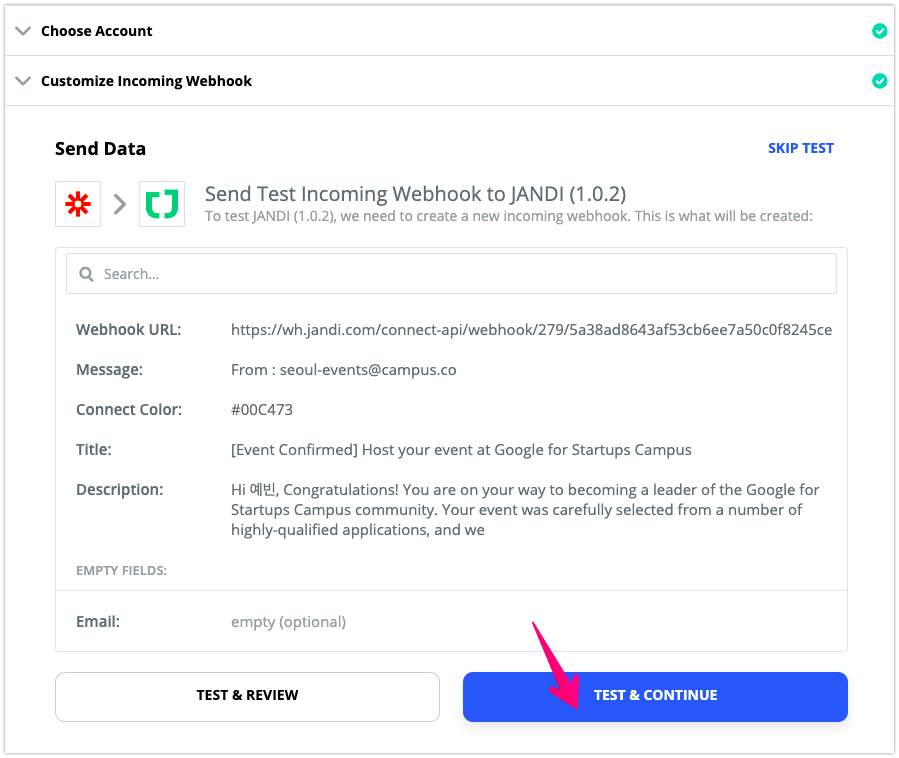
3-10. Last, press the [TEST & CONTINUE] button to test for JANDI webhook messages.
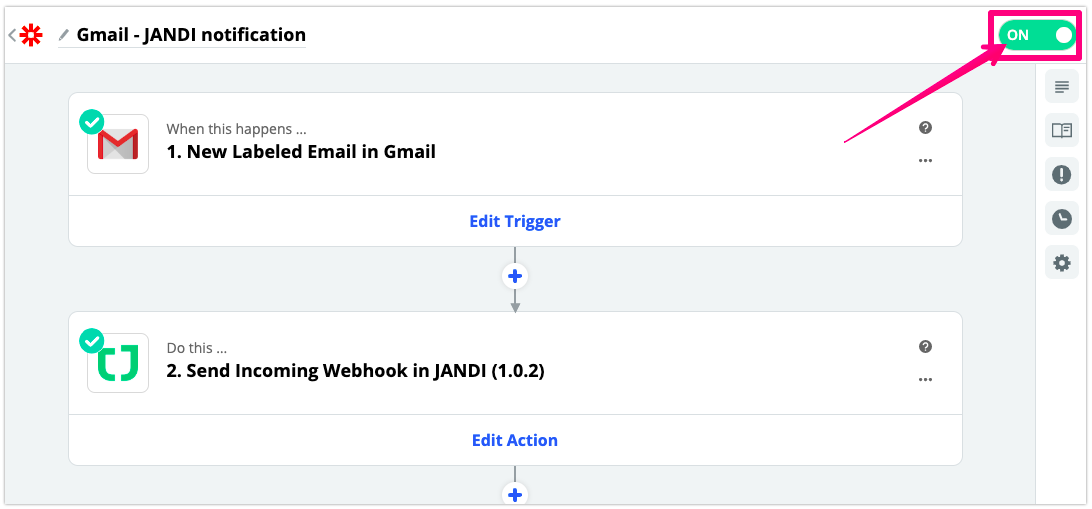
Please make sure to turn Zap [On] at the top right screen. Only when Zap is on, you can get JANDI notifications.
With Gmail – JANDI Connect, you can categorize various email notifications into JANDI topics and improve work efficiency.
Is there any case you would like to share with other JANDI users regarding JANDI Connect? Tell me the case at support@tosslab.com ! I’ll come back with a JANDI tip next time. Have a nice week. ?
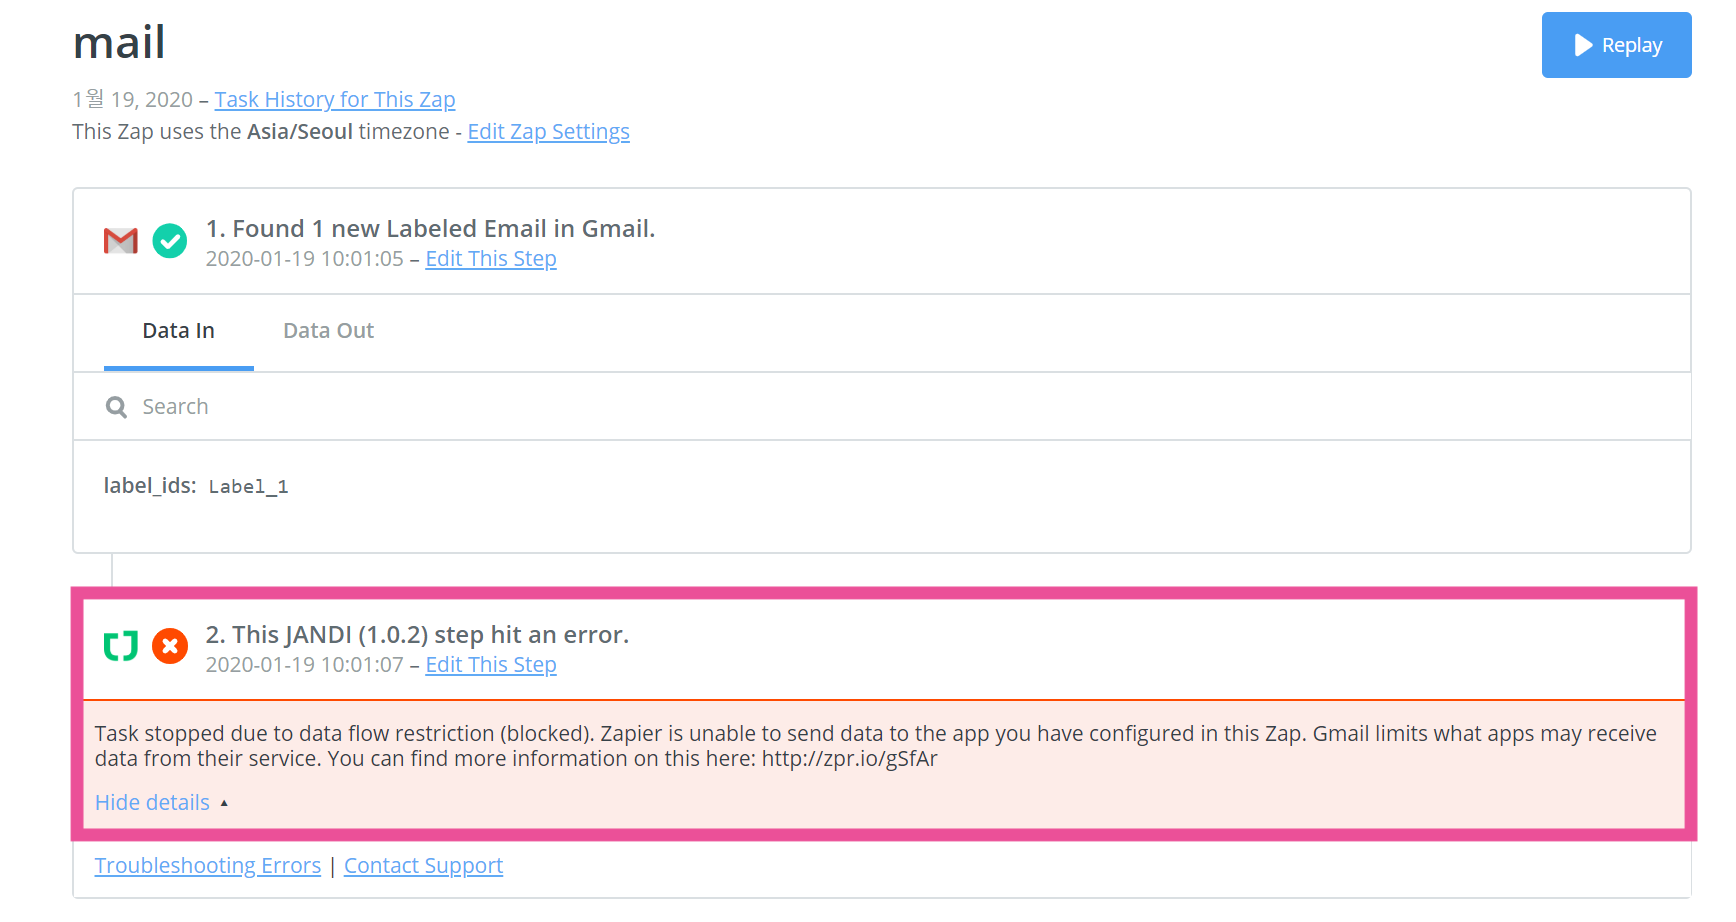
※ From May 2019, the policy was changed to send Gmail data to Zapier only with G Suite paid plan (including Gmail). (Read more > )
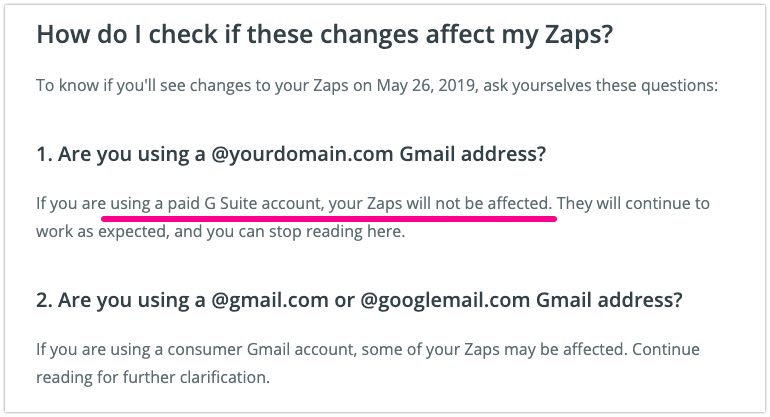
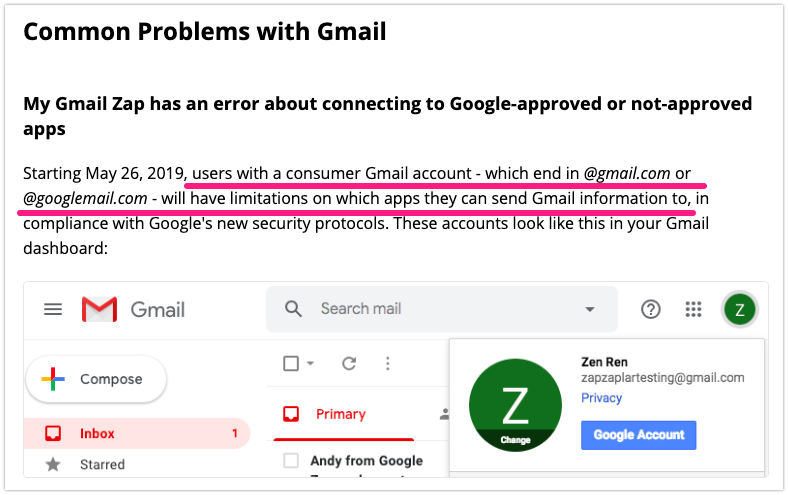
While there may be no problem sending a test mail following the above steps, if the actual notification message does not successfully enter the JANDI chats and an error occurs due to the following reasons, then this may be due to the reason of connecting free Gmail account.
So there are two solutions.
- After paying for a Google G Suite account, link a paid Business Gmail account to Zapier or
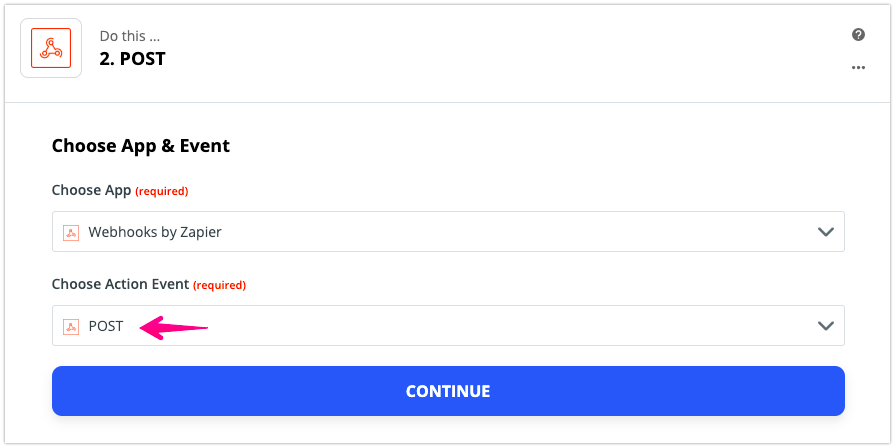
- On paid Zapier’s account, select a Webhooks by Zapier service instead of using ‘JANDI’ application from 3-7. step.
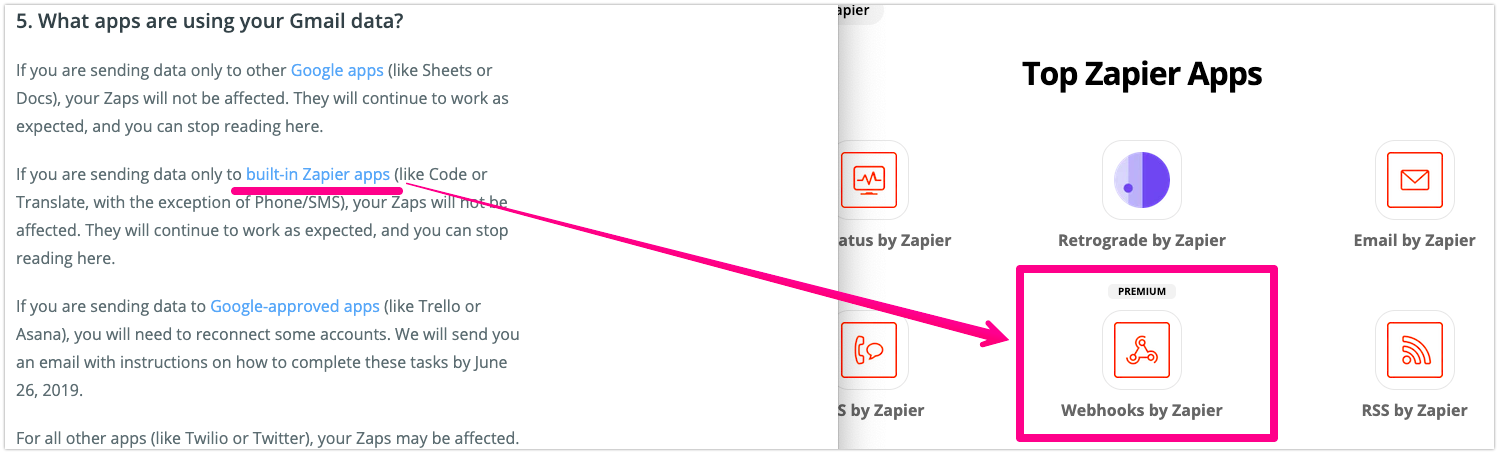
* Procedure for setting the 2. To do… step using Webhooks by Zapier is as follows. If it’s too difficult to do, please contact us at support@tosslab.com
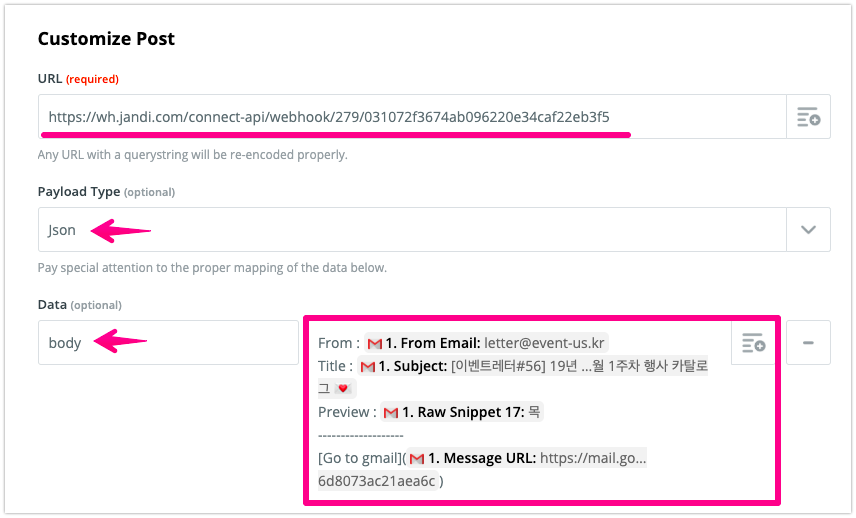
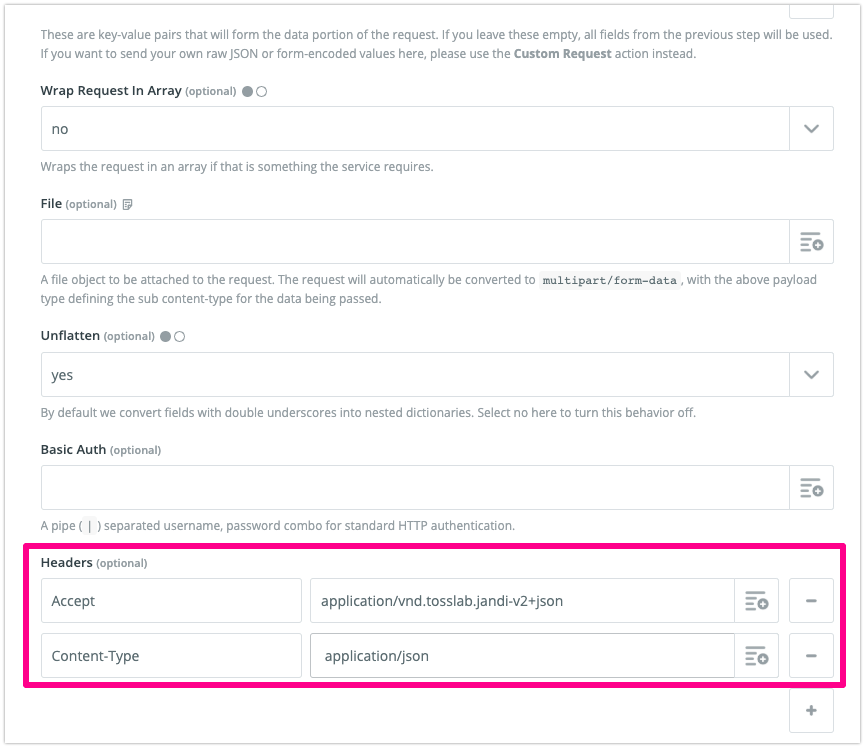
- Accept : application/vnd.tosslab.jandi-v2+json
- Content-Type: application/json
Related article: Get Google Form notifications on JANDI >>

Comments are closed, but trackbacks and pingbacks are open.